what class character is the best one to take to lever 250 in maplestory
MapleStory Training & Leveling Guide 2022 (Reboot & Normal)
Last Updated on by Samuel Franklin
Read our detailed MapleStory training and leveling guide to take your character to level 275 in the most efficient way possible. Whether you're on Reboot, Normal (regular) servers, an experienced MapleStory player or a beginner this guide is an invaluable reference to your account progression as yous learn where to railroad train in MapleStory
This MapleStory grooming guide is applicable for your main character or grooming mules for Link Skills and Legion. Information technology is designed with choice and variation in mind giving players multiple options at about stages of progression given unlike classes excel on different map layouts. This guide as well covers some full general training tips to maximise your gains for time invested into acquiring experience from the diverse MapleStory monsters of the broader world map and brand the overall grinding experience streamlined.
MapleStory Training/Leveling Tips
MMO games like MapleStory often involve a large corporeality of training and if you're wondering how to level up fast in MapleStory you'll desire to maximise your MapleStory training experience with the following tips:
MapleStory Preparation/Leveling Guide Summary
This grinding guide is intended as a full general list of suggestions that y'all can employ to find where to level and will be applicative to about classes on Reboot and Normal game servers. For most players unless they are rushing a grapheme with preselected gear and potion buffs yous'll desire to stay strictly to the level guide provided and not attempt to railroad train against monsters more than than 5 levels to a higher place your grapheme level. This is because you lot'll deal reduced damage in these situations and is particularly deadly on Reboot servers where this damage punishment is harsher. It is not uncommon for Reboot players following this equally a MapleStory Reboot training guide to exist fighting monsters a level range behind that recommended here especially for early characters you lot create due to the lack of business relationship wide bonuses (Link Skills and Legion).
You will always be the best judge of your ain progression, if you are killing slow consider returning to a previous location, if enemies are vanishing quickly off the map then try push button a little further. In this training guide for MapleStory boosted weight has been given to locations that provide useful items, are like shooting fish in a barrel to reach or are important quests for other reasons to give your account corking progression aslope grooming.
The beneath is a summary table of training options featured here for quick reference, for more than detail click on the hyperlinked level range or scroll to the bottom of this commodity. The detailed department includes discussion of why the selections have been chosen, some alternative maps in the expanse and notes several key potential dominate milestones in your progression. Each option in both sections is presented every bit follows (either monsters/bosses or quests chains):
Monster/Boss [Monster Level] (Star Force/Arcane Ability Required*) – Map Name (Globe Location)
Quest Name [Level Unlocked] – How To Start Quest
| Level Range | Content / Training Location |
|---|---|
| 1 – 10 | Complete your character tutorial |
| x – 20 |
|
| 20 – 30 |
|
| 30 – xl |
|
| 40 – 50 |
|
| 50 – threescore |
|
| 60 – 70 |
|
| lxx – eighty |
|
| eighty – 90 |
|
| 90 – 100 |
|
| 100 – 110 |
|
| 110 – 120 |
|
| 120 – 130 |
|
| 130 – 140 |
|
| 140 – 150 |
|
| 150 – 160 |
|
| 160 – 170 |
|
| 170 – 180 |
|
| 180 – 190 |
|
| 190 – 200 |
|
| 200 – 210 |
|
| 210 – 220 |
|
| 220 – 230 |
|
| 230 – 240 |
|
| 240 – 250 |
|
| 250 – 275 |
|
MapleStory Training/Leveling Guide Detailed
Below is the detailed section of our training guide with particular on every location.
Level 1 – 10
The easiest levels of your MapleStory journey where you'll only want to follow forth with any your class tutorial is and for some classes this may even accept you all the style to level 30 by following the bachelor questlines that they have.
Level 10 – 20
Another fast 10 levels that you can honestly complete but near anywhere at a reasonable stride so don't overthink it at this stage. Check the world map for your electric current course location and search around for monsters between levels ten and 20 to fight with your new first task skills. The majority of MapleStory grapheme classes will finish up on Victoria Isle, Edelstein or Grandis though which is the ground for the recommendations below.

- Golem [15] – Golem'south Temple: Golem'due south Temple Archway (Victoria Isle)
At level xv fighting Golems in this pocket-size map is a pop option and most class skills can easily attack multiple ledges thanks to the large size of this monster. - Flaming Mixed Golem [19] – Golem'due south Temple: Golem'south Temple 3 (Victoria Isle)
As you arroyo the later teen levels of your MapleStory hazard you can enter one of the portals in the previous Golem map to fight the fire variant which are the highest level Golem selection in this area. Similar to above it'south a tight map with multiple platforms that brand information technology piece of cake to chain kills together. Staying here until you reach the low 20s is a skilful option.
Level 20 – 30
Similar to to a higher place this level range will depend on your current location, if you aren't well-nigh any of the maps listed below then staying in your current expanse is fine provided it has a mob between level 20 and thirty to fight.

- Streetlight [25] – Concrete Road: Streetlight Row (Edelstein)
A unproblematic two platform map that some classes can possible hit both platforms at the same time that makes it highly efficient and thus included in this MapleStory leveling guide. I would only choose this location though if yous started in Edelstein and opted to stay in this surface area. - Evil Heart [26] – North Forest: Giant Tree (Victoria Isle)
Your all-time Victoria Island option is the giant tree and the various other maps beyond where y'all can observe other eye variants (Expletive, Cold and Surgeon) that go up to monster level 29. Move through these maps equally you feel comfortable or stay on a particular map that suits your MapleStory class strengths.
Level thirty – 40
Level 30 and onwards is where players can start to experience the theme dungeon content that MapleStory has to offer and i of the better methods to levelling your character. Not only do each of these offer instanced monsters (they marshal themselves to your current level) they also reward Mesos and other useful items in most cases. Completing all 3 of these recommended below can easily accept players to level 60 and all of them tin can exist accessed through the Maple Guide so y'all tin can visit them regardless of your starting location. Keep in listen that fifty-fifty if you don't want to do the quests the monsters in these areas level up with you and make efficient grinding maps. If taking this path I would personally go to Gold Beach or Ellinel Fairy Academy every bit the first few maps there are all peachy for leveling and accessed without doing any or minimal quest content.

- Ellinel Fairy Academy [30] – Maple Guide
A theme dungeon based around missing children of the Fairy Academy yous'll defeat diverse magical themed enemies and fight a Mole King. Completing this rewards players with a starting greatcoat, eye accessory, championship and glove with basic stats. - Golden Beach [xxx] – Maple Guide
Set at the Aureate Beach resort you'll fight through beach themed enemies every bit yous assist the employees with quests. For completing you'll earn a title (same stats as Fairy Academy) and some defence earrings that aren't specially useful. - Riena Strait [thirty] – Maple Guide
A sea based adventure that is a fiddling slower as you go back and along between locations to solve the mystery of rising tides. For your trouble you'll go a belt, face accompaniment and title which can be useful given these are rare detail slots to fill although are inappreciably game breaking in terms of power. You can work on your Mariner familiar badge while y'all are hither though.
Level 40 – fifty
Continue completing the theme dungeons noted higher up during this stage, if y'all don't desire to do these then your alternative options that are piece of cake to reach are limited. There are some practiced maps in Savage Terminal for this level range if you don't mind moving there through the Six Path Crossway shortcut detailed under the leveling guide tips department of this article or have a Hyper Teleport Stone bachelor.

- Jr. Necki [45] – Swamp Region: The Swamp of Despair (Victoria Island)
Attainable through the Maple Guide (level xl circle) this is a map with high spawn and piece of cake to motility betwixt the bachelor ledges. The small size of the monsters can be difficult for some class skills though so keep that in mind. - Hazard's Mean Crony/Adventure's Rotten Crony [42/40] – Abandoned Offices: Mr Take a chance's Lair two (Savage Terminal)
A high experience map due to both density and high experience per mob compared to similar zones this is a possible pick even before level 40. While the map does seem big at commencement glance a consistent clockwise or anti-clockwise pattern is a good start. This does require some moving around the Maple World if you don't start near this area for your class tutorial though and then keep that in mind.
Level 50 – 60
Continue completing the theme dungeons noted above during this stage, if you lot are still not at level 60 and accept completed all 3 y'all tin can consider grooming at one of the theme dungeon maps.

- Wild Boar [55] – Burnt Country: Wild Boar Land (Victoria Isle)
Accessing this map can be done through the level l circle of the Maple Guide and then moving ii maps to the right. Players tin proceeds a few levels here and so slowly movement to the portals to the left upwards to Burn Boars which are a level 58 monster. Note that each of these maps has some NPC quests that require yous to kill the monster on that map so are a source of additional experience and Mesos.
Level sixty – seventy
If you relish the theme dungeon style content so this level range offers another dungeon although its alternative is one of the best training maps in all of MapleStory so most players volition want to non go the theme dungeon route.

- Mushroom Castle [60] – Maple Guide
A story almost saving Princess Violetta from a deadly plot and in turn finding a partner for the beautiful mushroom. This quest does offer a pendant, greatcoat and title along with a few meg Meso although this items are likely to be replaced apace. In that location are a few monsters for both monster collection and your familiar badges that you tin selection up forth the fashion here. - Skeledog/Mummydog [62] – Digging Site: Military Camp 1 (Victoria Island)
Hiding in a subconscious portal players can reach this by using the Maple Guide to go to the Excavation Site and and then past the camp to the Intermission Expanse where you'll observe a hidden portal along the ground floor well-nigh the tower like ruins. This map is a unproblematic flat platform map with a hidden portal at the bottom (the knight) that lets y'all get from superlative to bottom with ease. - Copper Drake [65] – Swamp: Silent Swamp (Victoria Isle)
Some other location listed on the Maple Guide (level 60 circle) this is a popular training map and a well known one that can make finding a gratis aqueduct on populated servers such as Reboot difficult so those reading this every bit a MapleStory Reboot leveling guide will need to cistron that in. Information technology's popularity is driven by the flat platforms that players can motility betwixt and then take the subconscious portal dorsum to the summit to repeat the bike. If all channels are full you tin endeavor an alternative listed here or move one map to the correct which is notwithstanding a decent spot to railroad train. Annotation that Ilji is just outside of this map portal in Sleepywood with a quest to kill drakes for some extra experience. You should complete the postage stamp requirements for the Maple Guide (250 Copper Drakes) on every unmarried character y'all play in MapleStory as this permanent teleport to Sleepywood is extremely powerful for world navigation for your entire account progression.
Level 70 – fourscore
A level range with limited options that are easily accessible to travel to but does have an important theme dungeon for your characters growth that should be strongly considered.

- Cellion, Grupin, Lioner [71] – Orbis: Stairway To The Heaven 1 (El Nath)
Some other well known map in the MapleStory customs that has a familiar layout to other popular training locations with multiple platforms and an easy manner to achieve the meridian of the map (with a bound) before killing enemies on your fashion to the lesser of the map and repeating. Getting to this location tin exist done through the Maple Guide (level 70 chimera) for Orbis Garden and so moving a few maps. - The Afterlands [75] – Maple Guide
Bachelor from level 75 this is a highly recommended theme dungeon accessible from the Maple Guide as information technology provides permanent totems that are also considered to be one of the all-time totems in MapleStory. In improver to boosting your strength on your master character or mules for easier levelling you can easily earn around 10 levels for completing this content that takes effectually an hr. Given the complexity of this content and some bugs I recommend you follow a MapleStory Afterlands walkthrough guide.
Level 80 – 90
The Afterlands option higher up is withal applicable at this level range given its a theme dungeon and so the level of the monsters within are linked to your level. For training options players start to explore more than of the Maple World with locations based in Edelstein and El Nath.
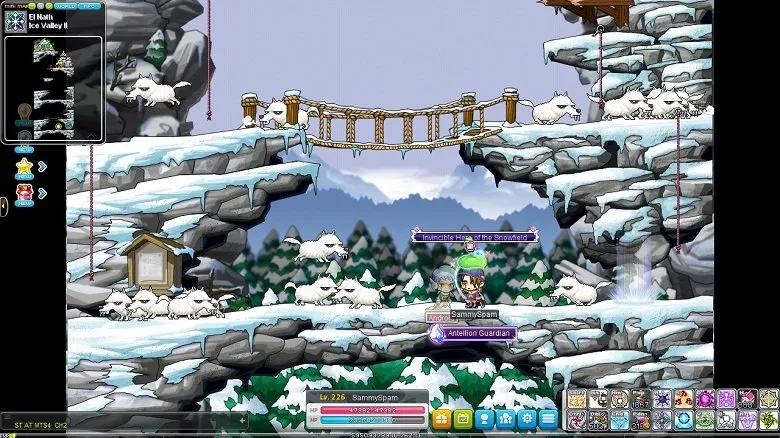
- White Fang [81] – El Nath Water ice Valley II (El Nath)
A solid training map that you lot can grab the danger zone taxi from El Nath to attain directly for 45k Mesos. This choice excels for characters with large attack ranges and leap heights that allows them to stick to the lesser of the map while attacking the 2 bottom platforms where the majority of the mob spawn is. Bonus on this map is the trader at the tiptop that you tin use to sell drops, purchase potions or refresh your usable ammo such every bit throwing stars. - Raco [83] – Verne Mine: Dangerous Raccoon Nest (Edelstein)
There are several maps around this location that are viable with monsters from level 81 to 85 which all belong to a familiar bluecoat set up. Players can also accept various quests in this expanse tied to hunting these monsters if they want some additional variety during the training process with each rewarding around 20% of a level up. Reaching these maps is once once again based on using the Maple Guide (level 80) to visit the Verne mine. If you lot'd rather sit on a single map though I recommend Racos as information technology's 1 of the smaller maps in the area. Shaft 4 is also an alternative selection which spawns the level 84 Guard Robot Fifty.
Level ninety – 100
For strong characters you tin can move to the Nihal Desert around the mid to tardily 80s just your average character and particularly offset fourth dimension characters without Legion or Link Skills will likely only desire to come up hither at xc. This is the principal preparation spot in this level and viable all the manner until level 100 or players can movement into the Magatia lab area for a change of scenery. At that place are multiple feasible options in the Magatia lab for those willing to explore the area with many high spawning maps with flat areas.

- Sand Rat/Scorpion [89/90] – Dusk Road: Sahel ii (Nihal Desert)
A flat modest map with high monster spawn makes this an obvious pop option for training and feasible until level 100 for those players that want to stay in a unmarried location. This map can be reached through the Maple Guide (level 80 and 90) with ease. - D. Roy/Neo Huroid [95] – Alcadno Research Found: Lab – Area C-3 (Nihal Desert)
As noted above there are diverse good maps in this lab area although I adopt to move here in the mid to late 90s to take a break from the Dusk Route and find C-3 one of the best although it is split over 2 levels. There are some single platform areas around hither and then don't be afraid to experiment for your class. Reaching this location requires players to move several maps to the right from the above mentioned training area so is like shooting fish in a barrel to reach. - Elin Forest [95] – Maple Guide
An alternative to grinding away in the desert map above for those that appreciate theme dungeon content which likewise rewards a championship and adventure for a decent band (Ephenia'south Band) from the dominate. This is non an end game ring but can help fill up your ring equipment slots for a small impairment boost.
Level 100 – 110
An interesting level range that introduces many outset opportunities with a daily dominate with high experience, Monster Park grooming grounds and Star Force maps. Your first opportunity to acquire substantial feel from a boss in MapleStory comes from the multi arm Zakum and recommended you lot exercise this every bit presently as yous hit level 100. From 105 players also unlock the useful Monster Park and Maple Tour daily tasks (although only the Monster Park offers experience for leveling) that tin be accessed through the Maple Guide Special Content tab.

- Beetle [103] – Minar Forest Leafre: East Wood (Minar Woods)
A fantastic overlooked map on many MapleStory preparation guide articles and one of my favourites. The uncomplicated map design, big platforms and subconscious portal to the top of the map is a familiar formula for a high quality map. It's also the first time you'll encounter called-for maps as this is an over 100 level area and information technology is easy to detect a maximum level ten burning (100% experience gain) hither. The level 100 Maple Guide allows you to get near Leafre hands through the Minar Woods pick or you tin can make your way to Leafre every bit this is but 1 map to the right. - Monster Park [105] – Maple Guide (Special Content Tab)
Your first adventure into Monster Park which is an instanced and stock-still map pattern that players can complete 2 times a 24-hour interval for free and buy 5 further entries for a total of 7 per business relationship. This remains an effective grooming option throughout your MapleStory career (particularly up to level 200) so you should be doing this daily for vast leveling gains. It'due south also an important activity given information technology offers a all-time in slot medal and the Monster Park Coins earned from this activity can be spent on powerful potions. - Blood Harpy [107] (v*) – Minar Wood: Sky Nest Ii (Minar Forest)
The first fourth dimension you'll be exploring a Star Force map that requires a minimum amount of Star Force before y'all tin can train hither. These Star Forcefulness maps volition generally characteristic tougher mobs merely advantage increased experience for your efforts. Given this though it'southward likely weak characters will be unable to train hither finer and I wouldn't rush here before level 107 either (stick to beetles above). - Zakum (Normal) [110] – Final Mission: Zakum's Alter (El Nath)
Given Zakum's level doing this at level 100 is usually the earliest opportunity. If done properly players can even obtain multiple levels from this fight by activating a rune from a map and whatever other available experience boosts beforehand. If you are leveling a graphic symbol to serve equally only a Link or Legion mule then I strongly recommend leaving them at the Zakum entrance and fighting this boss daily for highly efficient feel with little endeavour. Other daily bosses will beginning creeping into your daily activities from this indicate onwards based on your MapleStory damage range.
Level 110 – 120
Proceed with Zakum and Monster Park as noted above as they are still highly effective for this level range and beyond. In add-on to these you lot've got a stiff map in the toy town of Ludibrium (Ludi) and some theme dungeon quests with decent rewards to consider depending on your intentions for your character (can exist skipped for solely Legion/Link Skill mules).

- Robo/Master Robo [113/114] – Ludibrium: Toy Factory <Apparatus Room> (Ludus Lake)
The all-time grinding map for this level range that tin be accessed hands through the Maple Guide (Ludibrium Castle) and and so moving a few maps to the correct. Like all popular training maps y'all've got a small number of platforms with high robot spawns here to battle. - Lion Rex'southward Castle [115] – Maple Guide
A quest that you'll want to complete if you lot intend this to be a bossing grapheme equally information technology unlocks your power to fight Von Leon and provides some decent rewards and experience along the style. Finishing this quest volition crave you lot to fight monsters upward to level 129 though so there is no damage at starting this in your 120s and you'll still get okay experience. This can exist accessed from the Maple Guide (level 110 and 120). - Monad [115] – Maple Guide (Special Content Tab)
Another potentially useful quest equally it offers one of the best MapleStory titles and also gives plenty of experience. The content itself leaves a lot to be desired though equally it'due south slow paced and full of bugs so only consummate this on a character that yous recollect needs the championship advantage such as a bossing mule or your main account. Like to Lion Male monarch's Castle you lot might struggle to consummate this at level 115 depending on your gear so exit and render as necessary. To access this content yous'll want to visit the special content tab of the Maple Guide and employ the downwardly area on the story section. Keep in mind that this content scales well past this level and completing information technology at level 190 or later to help y'all make the final level push button to fifth job (200) is a feasible tactic that some MapleStory players utilise. - Dual Ghost Pirate [119] (26*) – Hidden Street: Unbalanced Time (Ludus Lake)
Equally you accomplish the stop of this level range y'all can consider taking the fight to a Dual Ghost Pirate Star Force map if you lot are on a strong character and can encounter the 26 Star Forcefulness requirement. You'll be unlikely to succeed hither without decent Legion or Link Skills already available and solid gear to back up it merely if y'all tick these boxes it can exist a high feel map up to your mid 120s. This map is located on Warped Path of Time 3 towards the bottom of the Clock Belfry Bottom and so taking the top right portal. While the map seems large at first its actually like shooting fish in a barrel to showtime from the top and work your mode through the platforms earlier taking a hidden portal on the right side of the screen support to the tiptop floor.
Level 120 – 130
Continuing with a mixture of theme dungeons and training maps your decisions here will depend on your preferences to content and if yous can meet Star Strength requirements. Don't forget to continue using Zakum and Monster Park for daily experience gains.

- Fantasy Theme World [120] – Maple Guide
A fun smaller in length dungeon set at an amusement park every bit you help a NPC with his love troubles and accessed through the level 120 Maple Guide bubble. Post-obit the storyline will earn you several levels and even if you don't desire to complete the total dungeon content there are many bang-up grooming maps here. - Korean Folk Town [125] – Maple Guide
Another theme dungeon mode piece of content which will progressively claiming y'all to head deeper and deeper into the training maps and one that I strongly recommend all players complete given its healthy experience and Meso gains. Along the fashion yous'll besides encounter various side quests from the Wanted signs that should also be accustomed for additional experience and Meso rewards. Like to Fantasy Theme World this can be accessed from the Maple Guide directly and has a large number of good training maps at this location for those that don't desire to bother following a quest line. - Moon Bunny [130] – Black Mountain: Entrance (Korean Folk Town)
The first map of the Korean Folk Town that surrounds yous with cute Moon Bunny monsters. This map is a fantastic training location and easily reached through the Maple Guide described above and an alternative for those that just want to grind away rather than completing the quests in this area.
Level 130 – 140
Korean Folk Town above remains viable all the mode up to level 140 as yous either do the quest or move between the diverse maps in this location. Outside of this players have some other powerful Star Force map with high requirements and so your decisions here will depend on your preferences to content and if you can come across Star Force requirements. This can also be a good level to add Easy Horntail and Normal Hilla based on your damage into your daily training mix for experience and items.

- Cerebes/Bain [134/136] (55*) – El Nath: The Cave of Trials II (El Nath)
With the highest Star Force requirement all the same this is going to exist out of reach for nearly characters unless you are investing heavily in their gear upgrades (such as a principal graphic symbol or bossing mule). If you encounter the Star Strength though this is a fast burn down themed map with strong spawns and can be accessed through the Maple Guide. - Xanthous Goblin [140] – Korean Folk Town: Goblin House (Korean Folk Town)
While in that location are many great maps in this MapleStory location equally highlighted to a higher place this map (forth with Moon Bunny) are definitely the superlative tier options. If you've followed the Korean Folk Boondocks quest line y'all'll finish upwards here anyway.
Level 140 – 150
Yellow Goblin above absolutely remain viable at this leveling range as they are a level 140 mob. During this stage you'll unlock a rush of theme dungeons with proficient items or serve as important pre-quests as well to prioritise although nigh volition carry over to level 150 and above. If you don't need these pre-quests or items on your character though then stick to preparation on a specific map at 3 Doors. During this stage you can likewise look to upgrade your Horntail bossing to Normal mode if your damage is high enough or wait until you reach level 150-160.

- 3 Doors [140] – Maple Guide
Serving every bit an important pre-quest to fighting Pink Bean who drops i of the best pocket items in MapleStory this is a central quest you'll want to focus on. This quest primarily revolves around visiting each of the maps in the Temple of Time and killing hundreds of each monster which range from level 140 to 155. If you hit a wall when trying to consummate any of these either swap to one of the other options in this level range or train at 1 of the maps at this location that is most efficient for your class (employ battle analysis). For those players wanting to just grind away at a location and not practise whatsoever quests I recommend y'all observe a map at this location. - Heizen Temple [140] – Maple Guide
An important pre-quest to unlocking the Princess No fight and giving yous access to Princess No secondary items and the Kanna, Ayame or Hayato Treasure drops. While you are unlikely to be able to kill Princess No at this stage having this quest on your radar is of import and it provides decent feel for your troubles and yous'll want this unlocked later. - Commercial Republic [140] – Maple Guide
Another cardinal theme dungeon as it gives you access to Commerci Voyages for end game face and heart accompaniment. This is a more difficult challenge compared to the other dungeons in this level range and so starting at 143-145 is preferred.
Level 150 – 160
You tin expect the difficulty of grooming to slowly ramp upwards here every bit you are shut to exiting the early game of MapleStory. During this level range yous can continue completing any of the dungeon content from the level range above and fighting whatsoever 150+ monster you feel comfortable with from that content (Three Doors has some of the all-time options). If you lot are on a fresh MapleStory account or a low geared mule you may find from this betoken onwards y'all need to stick to previous areas recommended in this training guide. This is particularly the instance for Reboot players as from here onwards the HP curve of monsters increases rapidly.

- Kerning Tower [145] – Maple Guide
While bachelor in the 140 Maple Guide section (and the 150) waiting until 150 to tackle the Kerning Tower quest content is often a good arroyo. This is because the levels of monsters yous demand to fight quickly tip over the 150 marking and they start to hit hard from here on that adds some other claiming to weak MapleStory classes. Like to other level ranges if you don't desire to follow along with the unabridged quest line then notice a map that y'all feel comfortable on with your course (2 suggestions below). Note that there are several Star Force maps here likewise to consider if you lot meet the requirements. - Enraged Espresso Motorcar [155] (lxxx*) – Kerning Tower 2F: Cafe <four> (Kerning Tower)
With a high Star Force requirement this might be out of reach for many that aren't gearing up their characters as y'all progress in levels as you'll finer need nearly of your equipment slots at 10/11 stars each. If can hit this requirement though this map has loftier density and fantastic experience returns. For those that can't railroad train here going one map o the left (Kerning Tower 2F Cafe <3>) is a viable alternative which features Enraged Espresso Machines at a lower monster level of 149 and includes Grape Jelly Juice (level 148). - Deadly Dressing Table [155] – Kerning Belfry 5F: Cosmetics Shops <3> (Kerning Tower)
An alternative option for those that tin can't striking the Star Force requirements to fight against the level 155 Enraged Espresso Machines. This map is 1 of the smaller variants in the Kerning Tower with skilful mob grouping and size that makes it one to level your characters on even beyond level 160.
Level 160 – 170
For the powerful MapleStory classes and accounts you've got a range of boss options that showtime to become uncomplicated affairs as your Hyper Skills start to come up online. This can include previously difficult challenges such equally Normal Root Abyss, Horntail and Von Leon. Don't forget to continue to use Monster Park diligently each day while tackling the leveling guide areas beneath. Prior to level 162 and unlocking Time to come Henesys you lot should stay at the previous training locations and if you are on Reboot you lot tin can await to stay in the previous locations fifty-fifty longer for most players.

- Future Henesys [162] – Maple Guide
Available through the Maple Guide this will transport players to a future version of Henesys, it can also be accessed through the Temple of Time at any point from thereon. Following this quest line tin can give you enough of experience although information technology's every bit viable to sit down at i of the training maps here with some locations all the mode up to level 200. - Mutant Orange Mushroom [164] – Singing Mushroom Forest Ruins: Dark Spore Hill (Gate of Future)
One of the amend early maps available in the Time to come Henesys location this is i map exterior of the Henesys Ruins. It has a simple 3 platform surface area that is not spaced too far apart and gives you enough of space to effort minimise damage taken every bit they can hit weaker characters hard. Players tin also try out the maps right of Future Henesys that have Mutant Slime and Ribbon Pigs although these enemies are tougher at level 166 and 168 while having slightly higher map complication. - Omega Sector [165] – Maple Guide
Accessed through the Maple Guide this is the start of a lengthy alien themed quest line that over again tin be washed if you'd rather not sit in a unmarried map and does take you through areas of the Mothership that are keen preparation spots. With monsters going all the fashion up to 179 in this expanse you'll probable have to stop and level up a number of times anyway every bit yous progress through Omega Sector. - Mateon/Plateon [165/167] – Omega Sector: Boswell Field Four (Omega Sector)
Moving four maps to the left of Omega Sector Base (despite the world map visual showing these to the right) you'll find this field of Mateon and Plateon aliens for preparation. The bulk of mob spawn is on the ground with ane small ledge to the left of the map that nearly characters should be able to reach to clear some of the monsters. There are some awkward hills on this map though so if you notice this unsuitable to your class you can try Boswell Field 3 or Two instead that are flatter in design merely slightly more than spaced out.
Level 170 – 180
For those post-obit this MapleStory training guide you'll observe this level range is mostly a repeat of the above with locations of Futurity Henesys and Omega Sector, admitting different maps and monsters. Level 170 does bring some new themed locations that have their own unique rewards though so shouldn't be passed over.

- Kritias [170] – Maple Guide
While unlocked at level 170 this is not an expanse you'll complete overnight and can easily have to late 180s and even 190 depending on your character strength. The completion postage stamp is great though as there are MapleStory dailies here that allow you to purchase boss reset tickets to fight more than bosses each week for Mesos and items and does crave some pre-quest content to be completed. There are a multitude of decent training maps here every bit well and then don't exist afraid to stay in one spot if you find 1 that works for you while questing here. Fifty-fifty the first few maps here are surprisingly effectively every bit a leveling location. - Ninja Castle [170] – Maple Guide
An accented must consummate as you tin can earn a 30 twenty-four hours toad pet from the boss here with 3 attempts each day that makes the completion stamp extremely useful. If y'all're on Reboot or Normal servers looking for an easy to acquire a MapleStory pet outside of Hard Hilla then this is the costless option to pursue. Note that this content includes a maze phase so using a Ninja Castle guide is recommended. - Gray Driver Saucer [173] – Inside the Mothership: Corridor 204 (Omega Sector)
If y'all've been confidentially fighting the aliens outside of the mothership players tin can click on the Intergalactic Transmitter on Boswell Field Iv to move into the mothership itself. One of the first potential maps here is Corridor 204 and characters with high jumping attacks volition perform the best here by moving along the bottom flooring for the virtually office. Corridor 202 is too another neat map here but y'all'll be fighting Gray Luxury Saucer instead that are a higher level of 175. - Advanced Knight A [177] – Knight Stronghold: Knights' Chamber 1 (Gate of Future)
Equally y'all start pushing 180 this is a viable map for classes that have a vertical jump or can hit the peak platform from below every bit at that place are simply ii platforms of high density knights although they have some serious infinite betwixt them then not ideal for everyone. This area can be reached from exploring out from Future Henesys using the Earth Map.
Level 180 – 190
A level range that offers much of the same and a good opportunity to revisit content from level 160 onwards that you lot were previously unable to consummate if you want the completions stamps or rewards for your character you are grooming.

- Gray Commuter Saucer/Gray Luxury Saucer [178/180] (140*) – Inside The Mothership: Corridor H02 (Omega Sector)
Offer the best experience at this stage it comes at a steep Star Strength requirement of 140. For most this volition exist out of reach but if it's possible for your grapheme you'll have no problem clearing this map apace at that high Star Forcefulness level. - Advanced Knight A/B/C/D/Due east [177/179/180/182/184] – Knight Stronghold: Hall of Honor (Gate of Future)
A map that combines all of the Advanced Knights and offers a suitable map with 3 platforms and hidden portal at the bottom to return players to the top platform and is attainable through Future Henesys Maple Guide or a direct Maple Guide option (170 and 180 Knight Stronghold Entrance). The consequence with this map though is that due to the level range of enemies yous can have an awkward kill speed. For instance you might exist able to kill Knight A in two hits only Knight Eastward might have iii or 4 so examination this out for yourself to run across if its appropriate.
Level 190 – 200
The last push to level 200 and your 5th job advancement which will then allow yous to unlock the Arcane River. Go on completing any content discussed above that yous consider a priority and fight monsters every bit high as yous can realistically do on this guide. For Reboot this might hateful staying in the 180-190 department for a while or focusing on gearing upwards through bossing before standing. If you didn't complete Monad earlier (from the 110 – 120 range of this preparation guide) now is a good opportunity to return to that as you lot'll earn a few levels.
- Twilight Perion [180] – Maple Guide
Another location in the Gate of Future that takes players to Perion this time effectually and a place you'll visit regularly all the way up to level 200 and sometimes beyond. While originally available in the level 180 chimera of the Maple Guide I would non bother coming here earlier 190. Either follow the quest lines here or focus solely on training at the maps listed below for faster leveling. - Oasis [190] – Maple Guide
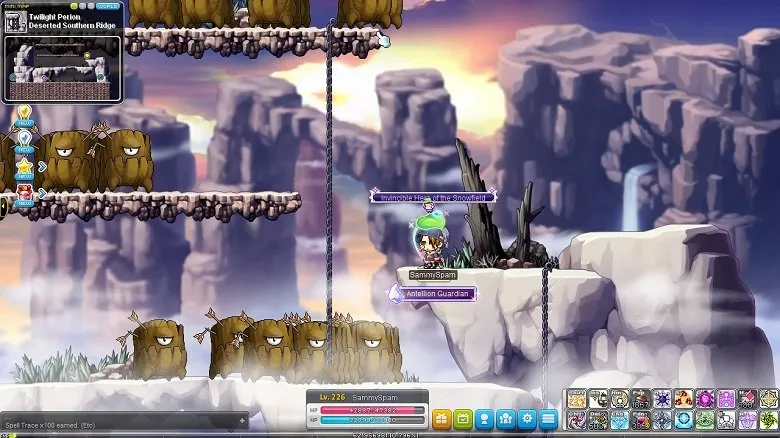
The Haven Maple Guide pick is unlocked at level 190 but to exist clear this should exist avoided until you are in your early 200s and even level 210. Information technology is included here though as the introductory quest can provide around 50% experience of an entire level and requires players to only perform some bones actions. For this reason information technology's pop for players to accomplish level 199 and 50% before completing this quest for the final push to 200. - Bloated Stump [190] – Twilight Period: Deserted Southern Ridge (Gate of Futurity)
If you tin fight the stumps effectively this is a surprisingly effective map for its size as the mob destiny is top tier. For optimal training stay on the top iii of the four platforms and use the hidden map portal on the left rocky mountain to move upwards while jumping downward the ledges. Desolate Hills can exist an alternative map with less platforms although a wider spawn area. Depending on your characters strength you might be staying at one of these all the way until level 200. - Sinister Rocky Mask [195] – Twilight Period: Forsaken Excavation Site two (Gate of Time to come)
One of the well-nigh popular maps in all of this MapleStory preparation guide and commonly referred to in the customs equally FES2. Like well-nigh of the stiff experience maps this features 3 platforms of loftier spawn and a hidden portal towards the lesser right to accept y'all to the top left of the map every bit required. Given its popularity it tin be difficult to obtain a high burning map so sometimes Deserted Southern Ridge at higher burning levels can actually be faster.
Level 200 – 210
You lot've finally made it to level 200 and your fifth job advancement where the real MapleStory game begins through Arcane Dailies and political party quests. You should aim to complete these for all Cabalistic River content you tin can access from here and these in themselves can provide double digit percentage points of feel in the process. Players now also need to factor in Arcane Force requirements into their training government both meeting the initial requirement and if you can reach 150% of the requirement y'all'll exercise bonus damage.

- Happy Erda [200] (30*) – Lake of Oblivion: Weathered Land of Happiness (Vanishing Journey)
Realistically on a fresh level 200 you are unlikely to have much success beyond the first map to the correct of Vanishing Journeying. This map has decent layout with a hidden portal to take y'all back to the tiptop while you alternating between left and right sides and features the weakest mob in this expanse at level 200 and simply requires 30 Cabalistic Power. As y'all get stronger you tin can also look to fight Raging Erda (level 201) at the Weathered State of Rage and Sad Erda (level 202) at the Weathered State of Sorrow that have similarly decent maps and the same low 30 Arcane Force. - Blazing Erda [205] (40*) – Extinction Zone: Burn Zone (Vanishing Journey)
When you lot reach the minimum 40 Cabalistic Force required and provided you accept the damage I recommend moving to this map, while larger it has fantastic spawn and a simple layout that lets you go from superlative to bottom killing mobs and use a hidden portal on the bottom to go directly upwardly again. If you can meet the high Arcane Ability requirement of Below The Cave (60) and then y'all can also consider that. - Reverse City [205] – Maple Guide
Contrary City is a worthwhile dungeon slice of content that is bachelor from level 205 and unlocks a wealth of better training locations for your graphic symbol that you should motility to as soon as available. The quest line volition take around an 60 minutes of your time and provides okay feel in its own correct. - Erda Rat [205] (40*) – Opposite City: Subway Tunnel 1 (Opposite City)
The introductory map of Reverse City alone blows your Vanishing Journeying options out of the h2o and should be transitioned to when possible. With 3 reasonably tight platforms many classes can jump attack their way through this map and hit everything comfortably. Don't expect to be hither for long though equally you should move along to the Reverse Metropolis map below when your impairment allows it given the Arcane Ability requirement is the aforementioned. - Seeker T-Drone Model A [206] (xl*) – Reverse City: T-Boy's Research Train 1 (Reverse City)
Another fantastic Reverse City map that is mostly full-bodied around two platforms in reach of fifty-fifty more characters and why its a top pick for rapidly clearing the map. While there is 1 third platform this can be reached past some classes or a vital location for your summons to handle whatsoever mob spawns at that place. - Potent Seeker T-Drone Model A/B [210/210] (100*) – Reverse City: Subconscious Enquiry Train (Reverse City)
A viable map all the manner upwards to 220 for some classes and allows you to skip the mediocre maps offered past Chu Chu Isle (do your ain boxing analysis though). The just affair that will stop you reaching this point is the 100 Cabalistic requirement that can have some fourth dimension to build up depending how fast you've progressed through the Arcane River thus far, the higher level of these monsters at 210 also ways you'll probably want to concur out until 150 Arcane for that bonus harm.
Level 210 – 220
Standing your Cabalistic River journey players can spend these levels staying in Reverse City without major issue and layering information technology with your new daily tasks and political party quest. For those that want some alternative maps though there are a few potential options that offer comparable experience gains.

- Angry Flyon/Ripe Wolfruit [213/213] (100*) – Slurpy Forest: Slurpy Woods Depths (Chu Chu Island)
The best bachelor map for this surface area sits at the end of a long path just worth the journey given it's simple vertical layout and standard hidden portal that makes vertical motion easy. If y'all tin can't find an available map on your server then Dealie-Bobber Wood 1 and Bitty-Bobble Wood 1 are viable alternatives as they have a similar level of enemy and the verbal same Arcane Power requirement. - Yum Yum Island [215] – Maple Guide
Following a similar formula to the previous level range after 5 levels in the area you lot'll unlock additional dungeon content that gives yous an hour long quest to follow and unlock some juicy experience maps (one in particular that is recommended and noted below). - Potent Lytone/Strong Stonepy [220/220] (190*) – Yum Yum Island Hidden Illiard Field (Yum Yum Island)
Pushing the Cabalistic required to 190 players ability to train here finer will depend on your speed of progression. Exterior of events that give you level boosting methods though most players should have accumulated this corporeality if doing dailies diligently. Similar all the other popular training maps to this point you have a tight three platform setup supported by a subconscious portal in the bottom right corner to reset your rotation or motion back and forth instead as you lot stay in the middle of the platform depending on your grade.
Level 220 – 230
In this level range players transition to Lachelein The Dreaming City although staying on Yum Yum Island can oft be fruitful equally the maps in that location are regularly disregarded which means they can have loftier burning in comparing to Lachelein maps. This is also one of the last level ranges of interesting training locations with your mail level 230 being generally limited to a minor number of maps or very course specific maps on the grind to level 275.

- Gallus [222] (210*) – Lachelein Night Market: Chicken Festival 2 (Lachelein)
The entry level map for this new area and a proficient alternative for some classes to the community meta maps as you'll observe expert called-for here. The trade off for this map is the high second platform that means but classes with effective summons, up movement options or large hitbox attacks can train here effectively. If you're aren't one of these classes then stick with Subconscious Illiard Field or endeavour push to Revelation Place 3 if your harm allows information technology. - Insane Masquerade Denizen/Angry Masquerade Citizen [224/223] (210*) – Lachelein Ballroom: Revelation Place iii (Lachelein)
The most popular map in this area with players setting up whatever available summon on the left awkwardly sized platform to bargain with that completely. Otherwise this map features a tight platform layout horizontally and vertically that means fiddling motion every bit you clear the map. - Dreamkeeper [226] (210*) – Lachelein Clocktower: Nightmare Clocktower 2F (Lachelein)
An disregarded option due to awkward maps in the clocktower simply this i comes with several apartment platforms equally you work your way vertically down through the map. A hidden portal to the bottom right corner is key to making this workable although this is a form dependant map based on your move options and chief attacking skills.
Level 230 – 240
From hither on there are many variables to finding a bully map which includes competing against the player base to find a high burning map or if you're on normal servers paying for your own frenzy service. Layering this with your class, key powerful progression points (similar Night Lord reaching a 1 hit on their Assassin Marks). For this reason from here on you lot'll need to use the MapleStory experience you've gained so far and battle analysis to discover what is nigh efficient for you merely these maps are a expert starting point.

- Snow Cloud Spirit/Thunder Cloud Spirit [233/234] (320*) – Arcana: Between Frost and Thunder ii (Arcana)
- Befuddled Spirit [237] (360*) – Arcana: Cavern Lower Path (Arcana)
- Addled Spirit/Mournful Spirit [237/239] (360*) – Arcana: Deep in the Cavern – Lower Path 1 (Arcana)
- Mournful Spirit/Discordant Spirit [239/240] (360*) – Arcana: Labyrinthine Cave – Upper Path (Arcana)
Level 240 – 250
Morass is generally ignored in terms of grooming maps as information technology lacks annihilation that can outpace those noted above in the 230-240 zone due to the poor map designs. That being said players do unlock Esfera at level 235 in the maple Guide that provides some useful hunting grounds although near players prefer not to move here until level 240 and if not 245 to eternalize their Arcane Power to meet the ever increasing requirements and because the best maps take a minimum monster level of 244.

- Aranya [244] (600*) – Esfera: Mirror-touched Body of water 2 (Esfera)
- Aranya/Aranea [244/245] (600*) – Esfera: Mirror-touched Sea 3 (Esfera)
- Deeper of Darkness [247] (600*) – Esfera: Mirror-touched Sea seven (Esfera)
Level 250 – 275
With players unlocking Limina at level 255 this is your primary goal and is your best option until level 275 currently. In order to span the gap between 250 and 255 though you'll either want to stick to Esfera or spend some time in Tenebris.

- Night Miscreation/Night Construct [256/256] (760*) – Tenebris: Labyrinth of Suffering Interior 5 (Tenebris)
- Ascendion/Foreberion [262/263] (880*) – Limina: Finish of the World i-5 (Limina)
Source: https://gameslikefinder.com/article/maplestory-training-guide/
0 Response to "what class character is the best one to take to lever 250 in maplestory"
إرسال تعليق